I Am.
By: Sarah
I am a wife, a daughter, a sister, a person.
I am an aunt, a cousin, a niece, a friend.
I have thoughts. I have feelings. I have convictions. I have faith. I have boundaries.
I am entitled to my thoughts.
I am entitled to my feelings.
I am entitled to my convictions.
I am entitled to my faith.
I am entitled to my boundaries.
Do not trample upon my thoughts.
Do not trample upon my feelings.
Do not trample upon my convictions.
Do not trample upon my faith.
Do not trample upon my boundaries.
If you want to be in my life, you must not force yourself upon me.
It won't get you far.
If you want to be in my life, your actions will speak louder than words.
Use force and meet resistance.
With grace, we will meet halfway.
Update: Since this was an incredibly random post, I wanted to give some background. This poem was written for an art project that two ladies from church are putting together. It's a combination of taking photos of women, pairing the photos with an I Am statement, and compiling the photos/stories into a large display. They have taken pictures of women from various walks of life, including women who were living in a shelter when their photos were taken. I will post a link as soon as I can find one.
Have you ever participated in a large scale art project? We'd love to hear your story!
Thursday, August 30, 2012
Tuesday, August 28, 2012
Hoovering like a Helicopter
My true colors are coming out today as I wait for our new vacuum to arrive. So far, I've checked the UPS tracking website, excitedly texted Matt to tell him it's on its way, cleared several areas to vacuum, ran to the window every time I heard a truck anything drive past our house, and trimmed the bushes in the front so that our house number is visible from the street. Am I overly excited? Yes, but can you blame me? Matt used this old Kirby for the last two years and although it didn't work well even when he got it, the price was right (a coworker gave it to him for free).

Its new home is the garage until we either put it on Craigslist, sell it to a local vacuum repair/resale place, or donate it to one of our siblings.
As far as choosing our new vacuum, we set a budget of $150-$200. I scoped out Target and gave Matt a list of three vacuums that interested me. He did all the research to choose the best option for us. We needed a vacuum that was lightweight, easily turned off the bristles (I intend to use it on our hard floors downstairs), and had a HEPA filter (preferably a washable filter). In my opinion, the HEPA filter was the most important feature since Matt has asthma and allergies. Fortunately, most vacuums these days have a HEPA filter. Our choices included the Hoover WindTunnel Air, the Shark Naviator Lift-Away, and the Shark Navigator Professional. We chose... the Hoover!
 We planned to purchase through target.com (though we could have purchased it in the store
 just as easily much easier) because we'd already used our 10% registry completion discount in store, but we still had our 10% target.com discount and enough gift cards to cover the whole vacuum (plus two sleeping bags for our upcoming camping trip!).
So, after six phone calls to target.com (don't even get me started!), and a few days of waiting, we received our sexy new Hoover! Within the first five minutes, it was already set up and I was vacuuming upstairs.
What's your favorite household electronic? Is it a vacuum, television, KitchenAid Mixer or something else? Leave a comment; I'd love to know if I'm the only one smitten by a vacuum cleaner (although the KitchenAid is a close second in my book)!

Its new home is the garage until we either put it on Craigslist, sell it to a local vacuum repair/resale place, or donate it to one of our siblings.
As far as choosing our new vacuum, we set a budget of $150-$200. I scoped out Target and gave Matt a list of three vacuums that interested me. He did all the research to choose the best option for us. We needed a vacuum that was lightweight, easily turned off the bristles (I intend to use it on our hard floors downstairs), and had a HEPA filter (preferably a washable filter). In my opinion, the HEPA filter was the most important feature since Matt has asthma and allergies. Fortunately, most vacuums these days have a HEPA filter. Our choices included the Hoover WindTunnel Air, the Shark Naviator Lift-Away, and the Shark Navigator Professional. We chose... the Hoover!
So, after six phone calls to target.com (don't even get me started!), and a few days of waiting, we received our sexy new Hoover! Within the first five minutes, it was already set up and I was vacuuming upstairs.
What's your favorite household electronic? Is it a vacuum, television, KitchenAid Mixer or something else? Leave a comment; I'd love to know if I'm the only one smitten by a vacuum cleaner (although the KitchenAid is a close second in my book)!
Wednesday, August 22, 2012
Sleepin' Pretty, Part I
My in-laws are awesome. They gifted us a beautiful bed frame for our wedding. You might recognize it from Crate & Barrel: it's the Pavilion Canopy Bed.

My husband, Matt, begrudgingly agreed to put it on our registry, thinking that no one would purchase it for us. He never saw himself with a canopy bed. That's not to say that he doesn't like it, but it's a departure from his comfort zone.We were I was happily surprised
when he came home with the news that his parents had purchased it for
us! It is sturdy, pretty, has the canopy part (for me), the low foot board (for Matt), and works well in our bedroom because of our vaulted ceiling! Excuse the poor-quality photos, but here is a "partial-before" photo of the bedroom; it was taken after we started to rearrange the bedroom, but prior to painting the walls.
After several coats of Behr's 'Rolling Hills' for our accent wall and Behr's 'Wheat Bread' for the other three walls, we were ready to have our new bed frame delivered and set up! I wasn't home to take pictures of the delivery and installation (because it wasn't my home yet), but here is what it looked like after a hasty decorating spree, using only items we had around the house. The result: an extraordinarily comfy bed, but not much depth to the decoration. My parents watered our plants while we were on our honeymoon and added the sheer drapes (leftover from our wedding) to the decor. What you can't see from this picture is that there is absolutely no furniture or decoration on the right side of the room.
Thanks to the generosity of family and friends, we were able to purchase the-only-duvet-we-could-agree-upon from our registry: the Marimekko Lumimarja Celery duvet cover from Crate & Barrel. We didn't worry about getting the whole matching set, though. Instead, we chose to accessorize with a variety of colors and textures.
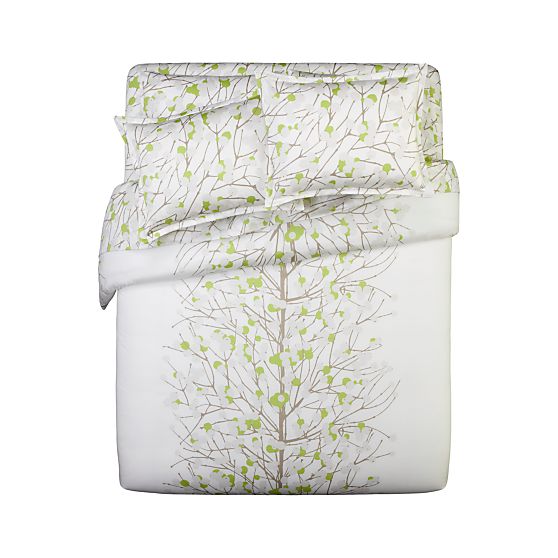
Enter Ikea. For $1 apiece we were able to snag two 26" square pillowcases from the As-Is Department, which fit two pillows that we already owned.

We also went on a bit of a Target shopping spree, where we found this beauty:
 And after some assembly time... we have a winner! So, with the addition of several more decorative items, including
several wedding gifts, we are done for the moment (until I get flowers
to fill the vase!).
And after some assembly time... we have a winner! So, with the addition of several more decorative items, including
several wedding gifts, we are done for the moment (until I get flowers
to fill the vase!).
And the side-by-side comparison:
I really wish I had the true 'before' photos. The dresser and television were originally centered on the wall where the console table and Midsummer Eve artwork now reside and the bed was directly opposite. Eventually, we want to refinish the nightstands and/or buy new ones,
install hard flooring, build an armoire into the area that currently has
my vanity table, build cabinets on the random ledge, and bring in a
small fireplace.
What's your favorite part of your master bedroom? Leave a comment and let us know! For kicks, my favorite part of my bedroom is feeling like a princess when I wake up, due to the comfy bed and the tree-filled view out our window!
P.S. The lamp base is also a Target find. They were on clearance several months ago and I sent Matt to several different Targets to find them. This picture also shows the necessity of refinishing these nightstands, pronto. Hubby stripped them, but never got around to refinishing them. He enjoys refinishing furniture, so they are his project :)

P.P.S. A second post is coming with the other half of the room and the bathroom, pending touch-up paint and curtains. Our closet (when the makeover is completed) deserves its own post.
My husband, Matt, begrudgingly agreed to put it on our registry, thinking that no one would purchase it for us. He never saw himself with a canopy bed. That's not to say that he doesn't like it, but it's a departure from his comfort zone.
 |
| Before |
 |
| Progress |

We also went on a bit of a Target shopping spree, where we found this beauty:
 | ||
| After |
 |
| Partial-Before |
 |
| After |
What's your favorite part of your master bedroom? Leave a comment and let us know! For kicks, my favorite part of my bedroom is feeling like a princess when I wake up, due to the comfy bed and the tree-filled view out our window!
P.S. The lamp base is also a Target find. They were on clearance several months ago and I sent Matt to several different Targets to find them. This picture also shows the necessity of refinishing these nightstands, pronto. Hubby stripped them, but never got around to refinishing them. He enjoys refinishing furniture, so they are his project :)

P.P.S. A second post is coming with the other half of the room and the bathroom, pending touch-up paint and curtains. Our closet (when the makeover is completed) deserves its own post.
Monday, August 20, 2012
A Lightbulb Went On!
A while ago, we decided that we would change out all of our ugly, tan-colored light switches and electrical outlets. We finally got around to switching out everything in the master bedroom and the current office, but when we turned the power on, the light switches that connect to electrical outlets (instead of ceiling lights) weren't working. A quick internet investigation revealed that there is a little tab on each side of the outlet. My finger is pointing at one of the tabs in the picture below.

When the tab is there, the electricity will run through the entire socket. So, in order for it to work with a light switch, the tab must be broken off to interrupt the hot wire. In the picture below, the the hot side is at the bottom. You might be able to locate the word "hot" directly above the left-side brass-colored screw.

Then, use needle nose pliers to wiggle the tab back and forth until the tab comes off.

Voila! You may then proceed to the outlet installation.

And the finished product:

Yay!
Sunday, August 12, 2012
From I-Do to To-Do
Thirty-six days ago, I married my best friend. It was a beautiful
day and we were blessed to be surrounded by so many family members and
friends! We've been home for a week (after our honeymoon and two
back-to-back family vacations, which were punctuated by two weddings at which we were guests) and we're finally starting to settle into our home. We've had a busy year. I graduated from college, we planned a wedding, we worked, and I
moved. My husband, Matt, bought our home two
Junes ago and it is a labor of love for both of us. Now that
we're both living here, I want to start chronicling our adventures and misadventures in our home as we update our house and give it the handmade touches that will turn it into a home. The goal of this blog is to track our progress and share our life with our family and friends.
In the past two years, we've painted all of the common areas and
installed laminate wood flooring on the first floor. We did a room swap in the process and turned our family room into a dining room, which left us with a much larger great room. We've also done smaller projects during this time: refinishing several furniture items, creating artwork, etc. Not a very impressive beginning. With our mishmash of furniture and belongings from childhood through now, we have a long way to go before our house becomes a home.
So, with out further ado, here is Mr. Incomplete To-Do:
So, with out further ado, here is Mr. Incomplete To-Do:
- Master Suite
- Paint bedroom and bathroom
- Remodel master closet
- Install hard floors
- Find and install new light fixtures in bedroom, bathroom, and toilet room
- Install baseboards
- New shower
- Strip, sand, and refinish vanity
- Replace all outlets and switches with white hardware
- Build armoire-like cabinets in empty area behind door
- Build storage cabinets in vaulted area
- Find comfy reading chair
- Build or buy really tall, shallow bookcases
- Find creative doors for our closet
- Office/Craft Room/Guest Bedroom (two
rooms that need to serve three purposes... but we haven't
figured outagreed upon how we will divvy up the space) - Paint
- Rearrange every item of furniture and every item on the walls
- Install hard floors
- Replace all outlets and switches with white hardware
- Great Room
- Repaint
- Rearrange
- Built-ins under the stairs
- Replace all outlets and switches with white hardware
- Install baseboards
- Kitchen
- Repaint
- Add island
- Strip, sand, and refinish cabinets
- Rearrange cabinets to fit all our new wedding gifts
- Replace countertops
- Fix the weird floor edge angle
- Dining Room
- Repaint
- New light fixture
- Replace all outlets and switches with white hardware
- Jack and Jill Bathroom: Mickey-themed
- Paint--Disney/Behr's "Smackeral of Hunny"
- Find linen tower
- Strip, sand, and refinish cabinets
- Powder Room: Botanical-themed (white, shades of green, bright pops of yellow)
- New sink hardware
- New light fixture
- Paint--Light, limey-green
- Strip, sand, and paint medicine cabinet
- Laundry Room
- Paint
- Add shelving above washer/dryer
- Create a storage solution for cleaning supplies
- Back Yard
- Replace bushes with flowers
- Create outdoor living space
- Build chicken coop
- Build composting bins
- Build raised platform area using bricks
- Replace current patio with bricks
- Add raised beds for kitchen garden
- Install clothesline
- Front Yard
- Less bushes, more flowers
Subscribe to:
Posts (Atom)